We’ve all been there: you click the Chrome icon, and then… You wait. That seemingly endless pause before your homepage finally loads can be frustrating. Tired of the delay? So was I, so I optimized Chrome for a faster startup.
6Enable Webpage Preloading
One of the first things I did tomake Google Chrome boot fast was to enable webpage preloading. This feature allows Chrome to anticipate which pages I might visit next, so it can start loading them in the background before I even click on a link.
This way, when I start the browser, it doesn’t have to wait for me to click on links; they’re already partially loaded. To enable webpage preloading, head toSettings > Performance > Speedand enable thePreload pagestoggle.

Chrome offers a couple of options in this menu:Extended preloadingandStandard preloading. I personally preferExtended preloadingbecause it allows Chrome to load most of the pages based on my browsing behavior.
5Configure Startup Behavior for a Quick Launch
Like most people, I have a particular set of webpages I open every time I launch Chrome. However, opening each webpage by entering the address, clicking the homepage shortcuts, or even navigating through the bookmarks menu can be time-consuming.
Instead, I’ve configured Chrome to open these pages automatically on startup, and it’s made a huge difference. Now, when I launch Chrome, it not only loads my main page but also loads the other pages I regularly visit in the background. So by the time I switch to a second tab, it’s already ready.

Having each of my favorite pages open when I start working is a massive time saver.
4Disable Energy Saver for Maximum Performance
Chrome’s built-in Energy Saver modeis great if you’re on the go and need to extend your laptop’s battery life. It achieves this by limiting background activities and slowing down CPU-intensive tasks.
However, since I mostly work from home, conserving battery isn’t a priority for me. Disabling this feature has noticeably improved my Chrome experience, both in terms of boot time and overall performance.

You can go toSettings > Performance > Powerand turn off theEnergy Savertoggle. If you prefer it to activate automatically when your battery reaches a lower level, you can leave the toggle on and chooseTurn on only when your battery is at 20% or lower.
3Enable GPU Rasterization
Rasterization is the process in which Chrome converts vector-based images or objects into pixels that can be displayed on the screen. By default, Chrome relies on the CPU to handle this task. However, with GPU rasterization enabled, Chrome offloads this process to the graphics card, which is better equipped for such tasks.
This results in a faster rendering experience, which is particularly noticeable when you launch Chrome. The GPU rasterization option isn’t available in Chrome’s regular settings menu, but you can easily enable it through Chrome’s hidden flags menu.

Unfortunately, Chrome’s Flags aren’t permanent settings. Sometimes, Flags are removed without warning, while at other times, they’re integrated into Chrome’s actual settings. So, you’ll have to keep an eye on this one.
2Limit the Number of Extensions
Each time I start Chrome, all my extensions must load and initialize, which takes time and resources. So, while extensions are incredibly useful, having too many significantly slows down Google Chrome’s performance.
To avoid this, I’ve reduced the number of extensions I use in Chrome. I’ve carefully selected only the ones that I truly need and use daily. This simple change has boosted Chrome’s startup speed, as fewer extensions mean fewer processes running in the background when it boots up.
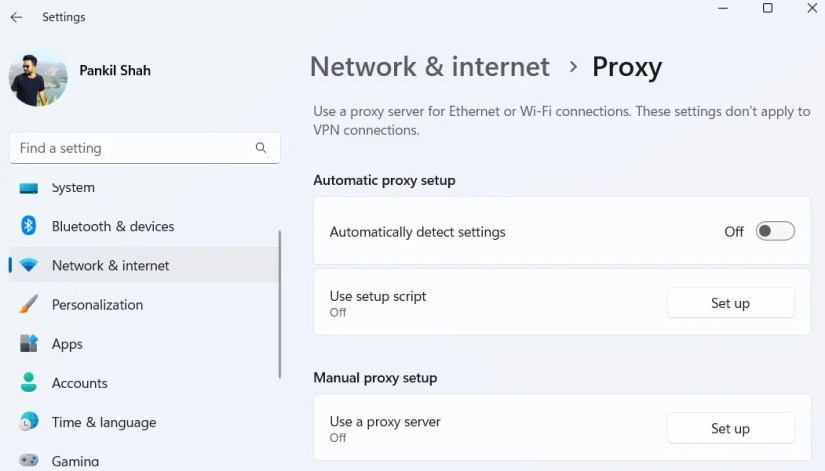
1Turn Off Automatic Proxy Detection
I recently started using AdGuard DNS to block ads, trackers, and malicious domains. However, soon after setting it up, I noticed a significant delay before the first page loaded each time I launched Chrome.
After a bit of digging and some trial and error, I found the culprit through aReddit thread. It turned out that Automatic Proxy Detection was the main cause of the delay, and disabling it fixed the problem for me instantly. You can do the same by heading toSettings > Network & Internet > Proxyand disabling theAutomatically detect settingstoggle.
